CHAPTER 10: Directional Control Valves, part 4
Solenoid pilot-operated valves
All the foregoing valves are operated directly by a solenoid plunger pushing against a spool. All D02-and D03-, and most D05-size valves are direct operated. This arrangement works well for small, low-flow valves, but is not a good setup for high-flow valves with large spools or poppets. Most direct solenoid-operated valves are rated at 20 gpm or less nominal flow. (Nominal flow is usually considered as the maximum flow a valve can pass at 35- to 50-psi pressure drop.) Most manufacturers’ literature shows flow and pressure-drop information for all valve sizes and flow paths. Keeping pressure drop low saves energy, reduces shock, makes for a quieter system, and minimizes leakage potential.
For systems with flows higher than 10 to 20 gpm, use solenoid pilot-operated valves with high flow capacity. They offer low pressure drop by incorporating small solenoid-operated valves that hydraulically shift large, high-flow spools. These valves look different physically and also have additional ports. The valves require a minimum pressure of 50 to 75 psi to shift the working spool, especially on spring-return or spring-centered models. A D02, D03, or D05 directly operated, 3-position valve that is spring returned, detented, or has a float center is the control choice. (See Chapter 4 for NFPA, ISO, CETOP, and NG valve size designations, relative physical size, port diameters, port configurations, and nominal flow ratings. For actual flow information and dimensions, always check the supplier’s catalog.)
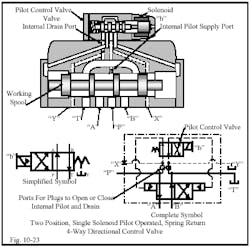
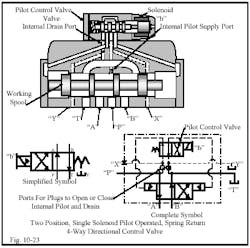
The simplified symbol typically is found on schematic drawings because internal details usually are not important. Notice that the symbol in Figure 10-23 has a solenoid slash and an energy triangle in the operator box to indicate solenoid pilot operation. The arrows in the symbol show the flow configuration of the working spool because it makes the actuator move. The only indication of the solenoid-operated valve is the solenoid slash mark in the operator box. The pilot control valve must have the right configuration to make the working spool operate, but otherwise is unimportant. In the case of this 2-position, spring-return valve, the pilot-control valve must also be a 2-position, spring-return model.
The complete symbol includes directional controls, internal porting, and internal connections that are plugged or open. (Later in this text, other features of the complete symbol will be shown and explained.) The enclosure outline around the two valves indicates they are a single piece of hardware. Lines passing through the enclosure outline are external connections and must be plugged if not connected.
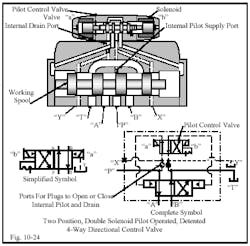
Figure 10-24 has a cutaway view and symbol for a detented, solenoid pilot-operated directional control valve. The only difference between this valve and symbol and those in Figure 10-23 is that the pilot control is a double-solenoid, detented valve instead of having a return spring. A spring-return valve can be converted to a detented valve merely by changing the pilot control. It is also easy to replace this double-solenoid, detented valve with a double-solenoid, 3-position, spring-centered valve that could allow the working spool to float when both solenoids are de-energized.
These first two types of solenoid pilot-operated valves must always be mounted so the working spool is horizontal. This keeps the working spool in place when there is no pilot pressure. The working spool could drift when mounted vertically because there are no springs to maintain its position. It is good practice to mount all spool valves horizontally to keep spools in place, especially during shutdown.
The Y (external drain) and X (external pilot supply) ports must be used in some circuits but their use is optional and up to the designer in others. A general rule is to drain pilot oil through the Y port when backpressure at T is (or can be) equal to or higher than pressure at P or X. Backpressure at T is seen at the tank port of the pilot-control valve. It resists pressure from the P or X port that tries to move the spool.
The X port is seldom used except where a constant pilot pressure is necessary. Another possible circuit is where a backpressure check valve in the T port can cause cylinder regeneration when the spool shifts through the crossover or transition position.
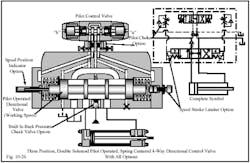
The solenoid pilot-operated 3-position, spring-centered valve in Figure 10-25 is the most common configuration for this type of hydraulic directional control valve. The center condition is often used to unload a fixed-volume pump, stop an actuator or allow it to float, and hold a cylinder at mid stroke while installing or removing tooling. More than 80% of hydraulic directional control valves are 3-position spring-centered for the above reasons and others. All directional valves have a spool that is capable of shifting to a center condition, but 2-position valves never stop in center position when working properly.
The cutaway view in Figure 10-25 represents a solenoid pilot-operated valve with an all-ports-open center condition. These larger, high-flow valves operate in the same way and perform the same functions as the direct solenoid-operated valves discussed earlier. (Refer to Figure’s. 10-18 through 10-20 for typical spring-centered circuits.)
The main difference in the circuits for solenoid pilot-operated valves is that the models with a pump-to-tank center condition need some method to maintain a continuous minimum pilot pressure to the pilot-control valve. Figure 10-25 shows the standard methods for maintaining such minimum pilot pressure.
These valves may also need a way to provide a free path for pilot oil to flow to tank (port Y) under some conditions. Adding or removing plugs – or installing an orificed plug -- can stop or allow flow to the internal-drain port or from the internal pilot-supply port.
The cutaway in Figure 10-25 shows springs and centering washers at both ends holding the working spool in its center position. The centering washers prevent a stronger spring from pushing the spool past center in case one spring is weaker. The spool in the cutaway view and the complete symbol represent an all-ports-open center condition. Other spools and their simplified symbols are shown below the cutaway.
The solenoid-control valve is a double-solenoid, spring-centered model with a float-center spool. All 3-position, solenoid pilot-operated, directional control valves must have a float-center spool to work properly. Any other spool center condition (except one with T blocked, and A, B, and P connected) will either not let the working spool center or will generate excessive heat. Always make sure the solenoid-control valve is 3 position and has a float-center spool when the pilot-operated directional valve is 3 position.
When the a solenoid of the solenoid-control valve is energized, it sends pilot oil to the right end of the working spool. This shifts the spool to the left. Pump flow at the P port is directed to the A port, and flow from the B port goes to tank through the T port. It is easy to follow flow paths on the complete symbol to see how any manufacturer’s valve functions, even when its construction is different. Energizing the b solenoid shifts the working spool to the right, producing the opposite flow condition and reversing flow to the actuator.
With the valve in Figure 10-25 at rest, it is obvious pressure would be low. When the valve and lines are sized for low pressure drop, pressure would probably be below 50 psi. This pressure would not generate enough force to shift the working spool against the centering springs, so no fluid can flow to or from the actuator. To overcome low or no pilot pressure the following options are available:
Option 1: Use a 75-psi backpressure check valve out of the T port, use an orificed plug in the internal pilot-supply port, and drain the pilot-control valve externally through the Y (external-drain) port. When the pump runs, the backpressure check valve maintains at least 75-psi pilot pressure, so the working spool can shift when signaled. When the circuit operates, pilot pressure may go higher, but it never drops below 75 psi. With an open-center valve, this option can make the cylinder regenerate if the cylinder has low resistance and/or an oversized rod. If this situation is suspect, use Option 2.
Option 2: Install the 75-psi backpressure check valve in the pump line and route a pilot signal from upstream of it to the X (external pilot-supply) port. This makes it possible to internally drain the pilot-control valve. An external drain could still be used, but would not be required. This option keeps pressure off a cylinder that could regenerate with the open-center valve in its center position. It also eliminates the possibility of regeneration when a tandem-center valve moves through an open crossover.
Option 3: Supply the X port with 75- to 3000-psi pilot pressure from another source. The external supply does not need to provide high flow. A constant pressure might be desirable to keep spool shifting and cycle time consistent.
Check the supplier’s catalog information to see what pilot pressure should be for a specific valve size and operating pressure. These figures change for different spools and are directly affected by tank line backpressure when using internal drains.
Option 4: Most suppliers offer an internal backpressure check valve option that operates almost the same as Option 1. The difference is that there is no pressure in the T tank line so an internal drain may be used. The main difficulty with this option is that this valve is not standard. Delivery probably is long and could affect machine downtime if the valve needs to be replaced.
Other solenoid pilot-operated valve options
The solenoid pilot-operated valve in Figure 10-26 shows some other options that manufacturers offer for special needs. All of these options may not be available from all suppliers, so check with the distributor before specifying a brand.
The spool-position indicator option helps to troubleshoot a circuit. When the pilot-control valve shifts electrically or manually but the actuator will not move, one reason could be that the working spool did not shift. On a valve without the indicator, the only positive way to know if this spool can move is to take the valve apart and check it.
The spool stroke limiter option imitates a simple flow control for different actuator speeds in both directions. This option limits spool travel, which restricts flow to or from the actuator -- similar to a flow control. This option should only be used where speed can fluctuate as pressure and force change.
The pilot-choke option installs a modular meter-out flow control between the pilot-control valve and the working spool to slow spool movement. Slowing the spool can give an actuator smoother acceleration and deceleration, thus reducing shock. The idea is great, but note that slower spool movement may increase cycle times beyond limits.
One thing that causes cycle time to increase is the fact that all solenoid-operated spool valve lands overlap the body lands. This overlap means the spool has to move some distance before fluid flow starts. When the spool moves slowly enough to give good control, the shift time out of overlap can be 0.5 to 1.0 second or greater. After the spool clears overlap, the actuator can accelerate very smoothly, but the extra time often cannot be tolerated.
Another addition to cycle time comes when the spool shifts to the end of its stroke. A spool can continue to move to the end of its stroke even though a partial stroke is passing all available flow. When reversing actuator motion or decelerating before the end of stroke, the spool may be shifted 1/16 in. or more past available flow. When the spool starts slowly moving to center, the actuator continues at full speed until the spool moves far enough to start restricting flow. From this point on, deceleration is very smooth, but time has been lost. Also remember: the speed at which the spool goes to center is the rate for accelerating the actuator in the opposite direction. This means that adjusting for acceleration both ways also affects deceleration in both ways. The spool stroke-limiter option can eliminate the time loss here, but will not help return shifting speed.
Another possible problem with the pilot-choke module is that it often has a flow rating of only 4 to 8 gpm. Adjusting that small amount of flow is very difficult, if not impossible. This problem limits the usefulness of the pilot-choke option. At present, the need for acceleration, deceleration, and flow variation can be handled better by proportional valves, which will be discussed in Chapter 12.
The integral backpressure check valve option was discussed as Option 4 on Figure 10-12.
Hydraulically centered valves
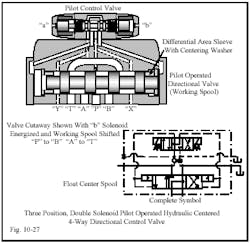
The cutaway view in Figure 10-27 represents a solenoid pilot-operated directional control valve that is hydraulically centered. A few designers prefer hydraulic centering to spring centering. The reasons given are: spring force changes over time, springs may break, response is slower with springs, and springs are relatively weak. Hydraulic centering has none of these faults, but is still specified on less than 2% of all hydraulic circuits. Part of the reason is lack of knowledge of many designers and users.
Notice that in the complete symbol, the pilot-control valve has port T to tank blocked in the center condition, with ports P, A, and B connected. With the pump running, the pilot-control valve sends pilot oil to both ends of the working spool, centering it. The working spool can center because the differential-area sleeves with centering washers can only move until they contact the valve body. With pressure at both ends, these items give a difference in area that causes the working spool to move until it centers. Other than the way the working spool centers, this design valve works the same as other solenoid pilot-operated directional valves.
Valve operators
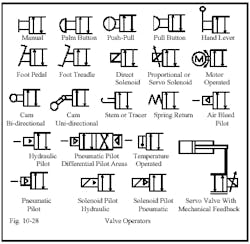
Figure 10-28 shows all the operators for directional control valves. Prior to 1966, the operator box on the symbol had letter abbreviations for the method of operating the valve written in them. (See Chapter 4, where old operator symbols are shown across from present day symbols.).
When ISO standards were adopted, all writing was eliminated from the picture-like symbols. The abbreviation MAN, for a manual operator, changed to extended lines at the operator box outer end or to a stick drawing of a palm button, hand lever, foot pedal or treadle.
With picture-like drawings there was no language barrier when schematic diagrams went from one country to another. ANSI adopted the new standards (with a few exceptions) and the fluid power industry changed soon thereafter. Old machines with pre-1966 schematics can confuse newcomers, but the drawing usually can be deciphered with a little effort.
