Push-lock hose fittings (aka push-lok, push-on, insta-grip and field attachable fittings) lets technicians attach connectors and fittings to hoses in the field for low-pressure hydraulic and pneumatic systems such as shop air, general industrial, maintenance and automotive assembly, to name a few. The assemblies handle pressures up to 350 psi, a limit set by the hose’s capabilities. This limitation also means most hydraulic systems cannot use them. Hose sizes include #4 (¼ in), #6 (⅜ in), #8 (½ in), #10 (⅝ in), #12 (¾ in) and #16 (1 in).
One of its major advantages is that it uses no clamps or crimp sleeves to secure the fitting into the hose, which saves assembly time. The lack of clamps and crimp barrels also eliminates their sharp edges, a potential injury hazard during assembly.
The push-lock system is not perfect, however. Installation can be physically challenging and must be done correctly, or else you risk a potentially dangerous blow-off. Often modifications are made to the hose by heating the end with a heat gun and/or using grease on the fitting barbs. Though this does simplify assembly, the resulting connections are most likely compromised and should not be used.
Understanding the design of the hose and fittings is the best way to ensure hose connections are leak-free and meet design pressures.
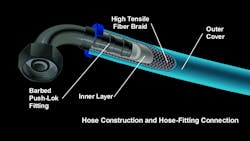
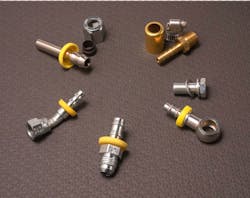
Push-Lok fittings are designed and manufactured with a specialized set of barbs that connect the hose to a vast number of different connections made of different metals compatible with the fluids they will carry. They include brass, steel and stainless steel. The barrel has three annular barbs and a tell-tale yellow cap covers the end of the hose when installed.
The hose also comes in a variety of types. The hoses’ part numbers indicate the temperatures, pressures and chemicals it will withstand. But all hoses have an internal braid or mesh to give it strength. When pressing a fitting into the hose, the hose expands slightly to accommodate the larger diameter of the fitting’s barbs.
Once the hose is completely pushed onto the fitting and into the yellow cap, the internal liner material conforms to the barbs under the pressure of the braid and the outer skin of the hose. The hose then acts like a Chinese finger trap. Trying to pull the fitting off makes the braid shrink around the liner and tighten its grip on the barbs, making nondestructive removal nearly impossible.
Assembly
Pushing the hose onto the barbed fitting may seem simple, but it is like trying to push a rope up a hill. Keeping the hose aligned with the barbs on the fitting is key, so stabilizing the fitting is a must. Putting enough force on the hose without it buckling can be challenging, especially when not using a tool to assemble it. Several other factors further complicate the process:
- Hose temperature. The colder the hose, the less it will want to expand to get over the barbs on the fitting.
- Hose diameter. Larger diameters are easier to assemble, while #4 hose, the smallest, is typically the toughest to install because it doesn’t have as much material to expand to get over the barbs on the fitting. Additionally, small-diameter hoses are harder to hold onto with your hands.
- Maintaining a constant pressure and feed rate once the fitting is partly in the hose is important to successfully complete installation. Often, getting the hose over the first two barbs goes well, but in the time it takes to stop and reposition your hands for the last push, the hose liner get a grip on the first two barbs and it is difficult to impossible to get it moving again. In such cases, there is little choice other than to cut the hose off and start over.
- 90-deg., 45-deg. and banjo fittings (which lack a surface to push against) can be a challenge. Putting them in a vice can mar the finish and may not work at all when in the field. Tube stub fittings should not be put in a vice because it damages the ferrule’s sealing surface. And pushing against a flat surface typically just causes a slide-out with hand injury.
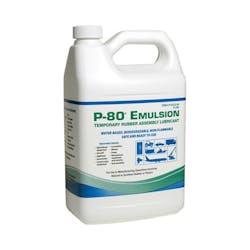
Greases and oils should not be used to facilitate installation. But there are approved water-soluble lubes for assembly of stubborn fittings. One such products, P-80 Emulsion from Dixon, provides a thin film of lubrication that significantly reduce frictions when assembling rubber or soft plastic parts. It dries without compromising the connection.
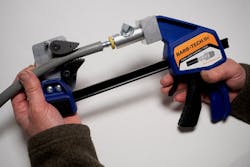
Assembly tools can simplify the hose-fitting assembly process and there are several options to choose from, though we are not aware of any that are truly automated. Most the tools available are hand-operated and leverage hand or arm force to press the fitting into the hose, but the process is not fast and requires some acquired technique.
Portability is another consideration. Most assembly tools are designed to be mounted on a bench, so the assembler must take the hose to the tool. But using a tool can save time and result in better, more-consistent installations. If you are working with some of the specialized fittings mentioned earlier, it is important to select an assembly tool that easily adapts to them.
When making or repairing hoses for any purpose, do not mix fitting and hose styles. If unsure of the fitting or hose, replace both with known components.
Push-lock hoses and fittings can save time and money when cut-to-length is important. Easing installation with a point-of-use tool ensures that barb hose connections are fully and safely installed.
Karl Wagner is president of Barb Tech Tools and inventor of the Barb-Tech IIc installation tool for push-lock fittings.
About the Author
Karl Wagner
President, Barb Tech Tools

Leaders relevant to this article:


